Getting Started
This is an introduction to DTanks. It covers installation of DTanks and the creation of a tank. Total time required: ~20min
Dtanks is a game for D programmers. Players program the brain of a tank and then send their tank + brain into battle against other tanks
You should be familiar with the D programming language as well as using git and dub in order to follow this tutorial. This should work on OSX, Linux and Windows but this tutorial uses OSX Yosemite.
Before getting started make sure you have the following installed.
- Git (brew install git)
- D and Dub (brew install dub) will get both
Follow the guide for your OS on the Installation & Running Instructions
The following is for OSX:
git clone https://github.com/masterthought/dtanks.git
cd dtanks
Then point the path in the dub.json for lflags to the correct DSFML:
lflags" : ["-L/Users/kings/development/projects/dtanks/DSFML/OSX/lib"],
Then install the OSX libs onto the Frameworks path by running:
dtanks/DSFML/OSX/install.sh
Then run dub in the dtanks root directory:
dub
If there are any missing dependencies you may have to install them via brew e.g.
brew install glew freetype libsndfile
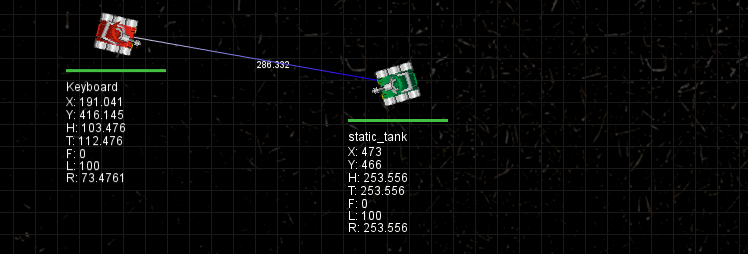
If everything worked as expected when you ran dub a window should have popped up of dimension 12-0 x 700 with 2 tanks. One called static_tank which doesn't do anything and one called Keyboard which you can control with the keyboard.
You can change some of the settings in the properties.json file in the dtanks directory - e.g. the window dimensions as well as the max number of ticks for the game.
Play around with the Keyboard tank here are the keys to control the tank:
| Key | Action |
|---|---|
| A | Rotate tank body left |
| D | Rotate tank body right |
| W | Move tank body forward |
| S | Move tank body backwards |
| Arrow Left | Rotate tank turret left |
| Arrow Right | Rotate tank turret right |
| Arrow Up | Fire max power shot |
| Arrow Down | Fire min power shot |
| R | Rotate tank radar left |
| T | Rotate tank radar right |
| C | Randomly change tank colour |
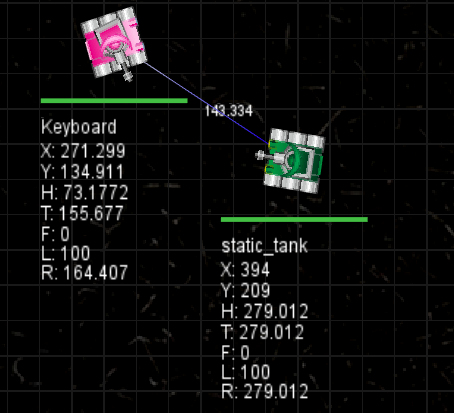
You will notice that when the keyboard tank is in the game you get some information under the health bar as well as lines connecting the keyboard tanks to other tanks. The line is showing the distance between keyboard tank and each of the other tanks.
The information displayed shows:
| Info | Meaning |
|---|---|
| X | The X position of the tank |
| Y | The Y position of the tank |
| H | The heading of the tank in degrees |
| T | The turret heading in degrees |
| F | The firepower (0 = not firing, to 5 max) |
| L | The amount of life remaining 0-100 |
| R | The radar heading in degrees |
Once you have gotten used to the Keyboard tank try to play against the seek and destroy tank in the samples folder.
Any tanks you put in the src/mytanks folder will appear in the game. So close the game window and copy the seek and destroy tank from the samples folder to src/mytanks:
cp samples/seek_n_destroy.d src/mytanks/
dub --build=release
Play around and try to defeat the seek and destroy tank. After you get the hang of it continue on below.
The Keyboard tank is fun but let's make a tank that can drive itself.
The easiest way to get started is to edit the src/mytanks/staticbot.d starter tank as it's just a shell that doesn't do anything.
Open the src/mytanks/staticbod.d in an editor of your choice. I recommend the sublime text 3 editor.
The first thing to do is change the name of the tank:
override public string name(){
    return "My Awesome Tank";
}
And next you can change the colour of your tank:
override public SkinColor skin(){
  return SkinColor.green;
}
The available colours are in the SkinColor enum
Time to give your tank some intelligence.
Bot::Brain - This is where you will spend most of your time, as your tank is an instance of this class. DTanks uses a loop to update the state of the game. Every iteration of this loop calls the tick() method on your Brain instance. This is your chance to react to any changes in the game since the last tick, by reading from the sensors and giving commands. This method is called many times per second.
There are two primary methods #commands and #sensors to control the tank and get information about your tank, respectively. We’ll go into more detail about these methods below.
Heading - Angles are represented by instances of this class. For example, to turn the tank, you pass an instance of Heading to command.heading=. Review the documentation for that class to familiarise yourself with it, as it’s used throughout the project. Most of the time you will need to get the .radians from the heading in order to perform calculations e.g.
command.heading = new Heading(sensors.heading.radians + Heading.ONE_DEGREE * 3);
or using the brain_helper.d mixin (discussed shortly)
command.heading = currentHeadingPlusDegrees(3);
Examples:
new Heading(Heading.NORTH) is a heading pointing up, and new Heading(Heading.EAST) to the right. Headings are always absolute, never relative to the tank or any other object.
Point - Locations of objects, such as tanks, are described with instances of this class. The upper-left corner is (0,0).
Now we have to code a bit of D to get your tank moving.
Have a look at the Bot::Command class. Each tick, you are provided with a new instance of Command via Brain#command.
There are limits to how you can control your tank. There’s a speed limit, rotation limit, etc. Don’t worry too much about that now, because if you provide a speed over the limit, for example, it will automatically be corrected to the maximum allowed. See BrainHelper mixin for some useful constants when setting command values.
There are three main aspects of your tank to control:
- body
- radar
- turret
#####Body The main part of the tank which everything else is attached to. The body can move forward and backward at a variable speed, and also can turn at a variable speed. The two methods to use are command.speed= and command.heading=. Pass a negative speed to move backwards.
There limits to the values you can pass to each of these methods. If you pass a larger value than is allowed, it will be reduced to the maximum allowed.
#####Radar The radar can rotate independently of the body. It’s purpose is to detect other tanks. The radar has a limited field of vision so you can only detect other tanks that your radar is generally pointed at. Use the method command.radarHeading=, passing an instance of Heading, to rotate the radar.
#####Turret The turret/gun can fire shells and can also rotate independently. Rotate the turret with command.turretHeading= and fire the gun with command.fire. Send a large value to #fire to fire a fast shell, and a smaller value to fire a slower shell. You can also use command.firePower= to fire.
Slower shells do less damage, but can be fired in rapid succession. Fast shells do more damage, but require more time between shots for the turret to recover.
Example
Enough explaining! To get a better idea of how all this comes together to control your tank, make some changes to your code. Provided below are some sample changes, but you’re encouraged to experiment with variations to better understand how to control the tank.
Change the tick() method of your tank to something similar to the following:
mixin BrainHelper;

override public Command tick(Sensor sensors){

  command.heading = new Heading(Heading.EAST);
  // full speed ahead
  command.speed = maxSpeed;
  // while looking behind us
  command.radarHeading = new Heading(Heading.WEST);
  // and aiming down
  command.turretHeading = new Heading(Heading.SOUTH);
  // and firing some slow & rapid shells
  command.fire(minFirePower);

  return command;
}
After making changes, start a new match. Depending on where your bot starts, you’ll see it spin around the move to the right border while firing. Try it a few times as the bots are randomly placed in the arena each time.
By this point, you can hopefully drive your tank as you would like, but you will be driving blind so to speak. You need help from the tank’s sensors to figure out how to better react.
###Input
Have a look at the Bot::Sensors. Each tick, you are provided with a new instance of Sensors via Brain#sensors.
There are many things we can detect about the game state via the Sensors instance. Most are self-explanatory.
#####Health If your health falls below 0, your tank blows up and is removed from the game. It could be helpful to monitor this value and modify your strategy if you are low on health.
#####Gun Energy If this value is below zero, you cannot fire shells. If you fire fast shells, your gun energy depletes more quickly than slower shells.
#####Radar It is useful to detect the position of other tanks. radar.getReflections() returns an array of Radar::Reflection instances. A reflection contains the name, distance, and heading of the detected tank. Depending on the heading of your radar, you will be able to detect some or no tanks.
Example
Like before, we will modify the tick() method of your tank to try out some sensing methods.
Change the tick() method of your tank to something to the following:
mixin BrainHelper;

override public Command tick(Sensor sensors){

  command.heading = new Heading(Heading.EAST);
  // full speed ahead
  command.speed = maxSpeed;
  // while looking behind us
  command.radarHeading = new Heading(Heading.WEST);
  // and aiming down
  command.turretHeading = new Heading(Heading.SOUTH);
  // and firing some slow & rapid shells
  command.fire(minFirePower);


  // every 100 ticks, log sensor info
  if(reachedTickInterval(100)){
    writeln("Tick: ", sensors.ticks);
    writeln("Gun Energy: ", sensors.gunEnergy);
    writeln("Health: ", sensors.health);
    writeln("Position: (", sensors.position.x,",",sensors.position.y,")");
    writeln(sensors.position.onWall() ? " On Wall" : " Not on wall");
    writeln("Speed: ", sensors.speed);
    writeln("Heading: ", sensors.heading);
    writeln("Turret Heading: ", sensors.turretHeading);
    writeln("Radar Heading: ",sensors.radarHeading);
    writeln("Radar Reflections: ", sensors.radar.getReflections().length);

    foreach(reflection ; reflections()){
      writeln("name: ", reflection.name, " ,heading: ", reflection.heading, " ,distance: ", reflection.distance);
    }

  }
  return command;
}
start the match in release mode so you can see the output as in dev mode the DSFML output is rather noisy:
dub --build=release
After making changes, start a new match. This time, pay attention to the console where you start the match from. Every 100 ticks, your tank will log its sensor state. Try moving the Keyboard tank in and out of your tank’s radar view.
If you drive the keyboard tank exactly in line to the left side of the tank you will see the keyboard tank appear in the reflections list since the radar is pointing west.
###Summary
We have seen how to control a tank and also how to analyze the game state. Now it is time to add some logic to help your tank better defend itself and maybe even win a match. Take a look at the SeekAndDestroy tank, which is included in the samples folder, for an example of a complete working tank.
Good luck with your tank creations :)